Build a 2D game with Python
Python is an outstanding language for people learning to program, and perfect for anyone wanting to "get stuff done" and not spend heaps of time on boilerplate code. Arcade is a Python library for creating 2D video games that is easy to start using, and very capable as you gain experience. In this article, I will explain how to start using Python and Arcade to program video games.
Installation
Arcade, like many other packages, is available via PyPi, which means you can install Arcade using the pip command (or the pipenv command). If you already have Python installed, you can likely just open up a command prompt on Windows and type:
pip install arcade
Or on MacOS and Linux type:
pip3 install arcade
For more detailed installation instructions, you can refer to the Arcade installation documentation.
Simple drawing
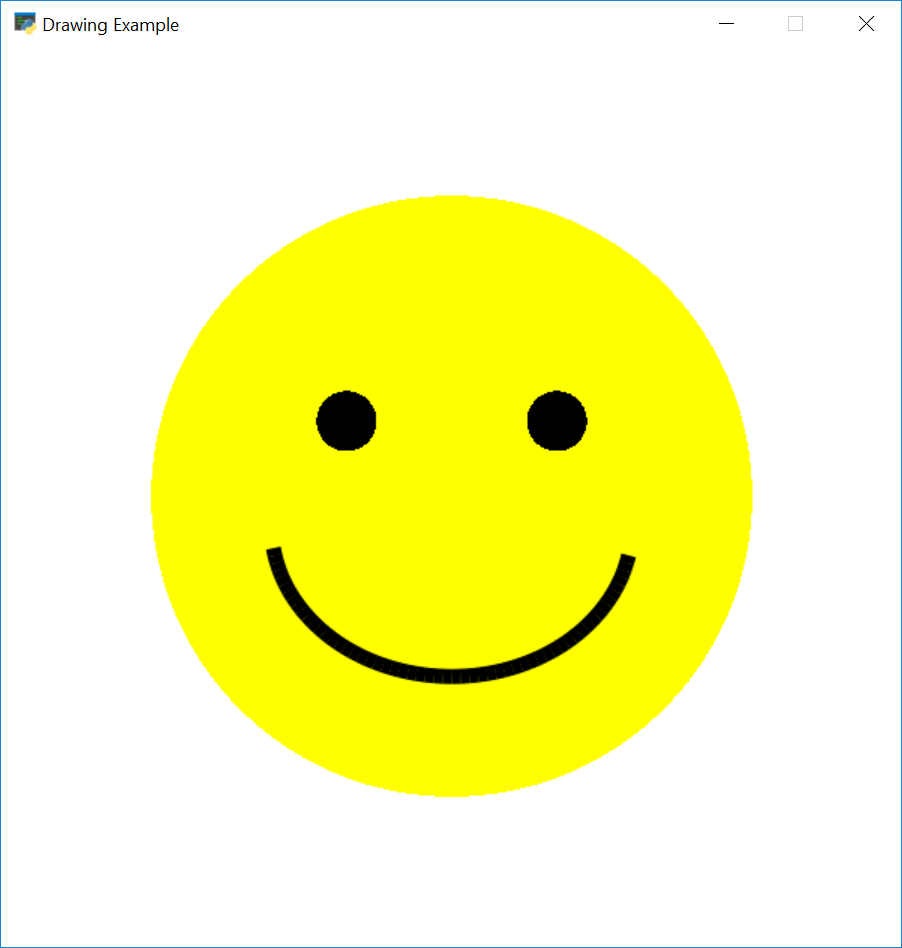
You can open a window and create simple drawings with just a few lines of code. Let's create an example that draws a smiley face like the figure below:
The script below shows how you can use Arcade's drawing commands to do this. Note that you don't need to know how to use classes or even define functions. Programming with quick visual feedback is great for anyone who wants to start learning to program.
import arcade

# Set constants for the screen size
SCREEN_WIDTH = 600
SCREEN_HEIGHT = 600

# Open the window. Set the window title and dimensions (width and height)
arcade.open_window(SCREEN_WIDTH, SCREEN_HEIGHT, "Drawing Example")

# Set the background color to white.
# For a list of named colors see:
# http://arcade.academy/arcade.color.html
# Colors can also be specified in (red, green, blue) format and
# (red, green, blue, alpha) format.
arcade.set_background_color(arcade.color.WHITE)

# Start the render process. This must be done before any drawing commands.
arcade.start_render()

# Draw the face
x = 300
y = 300
radius = 200
arcade.draw_circle_filled(x, y, radius, arcade.color.YELLOW)

# Draw the right eye
x = 370
y = 350
radius = 20
arcade.draw_circle_filled(x, y, radius, arcade.color.BLACK)

# Draw the left eye
x = 230
y = 350
radius = 20
arcade.draw_circle_filled(x, y, radius, arcade.color.BLACK)

# Draw the smile
x = 300
y = 280
width = 120
height = 100
start_angle = 190
end_angle = 350
arcade.draw_arc_outline(x, y, width, height, arcade.color.BLACK, start_angle, end_angle, 10)

# Finish drawing and display the result
arcade.finish_render()

# Keep the window open until the user hits the 'close' button
arcade.run()
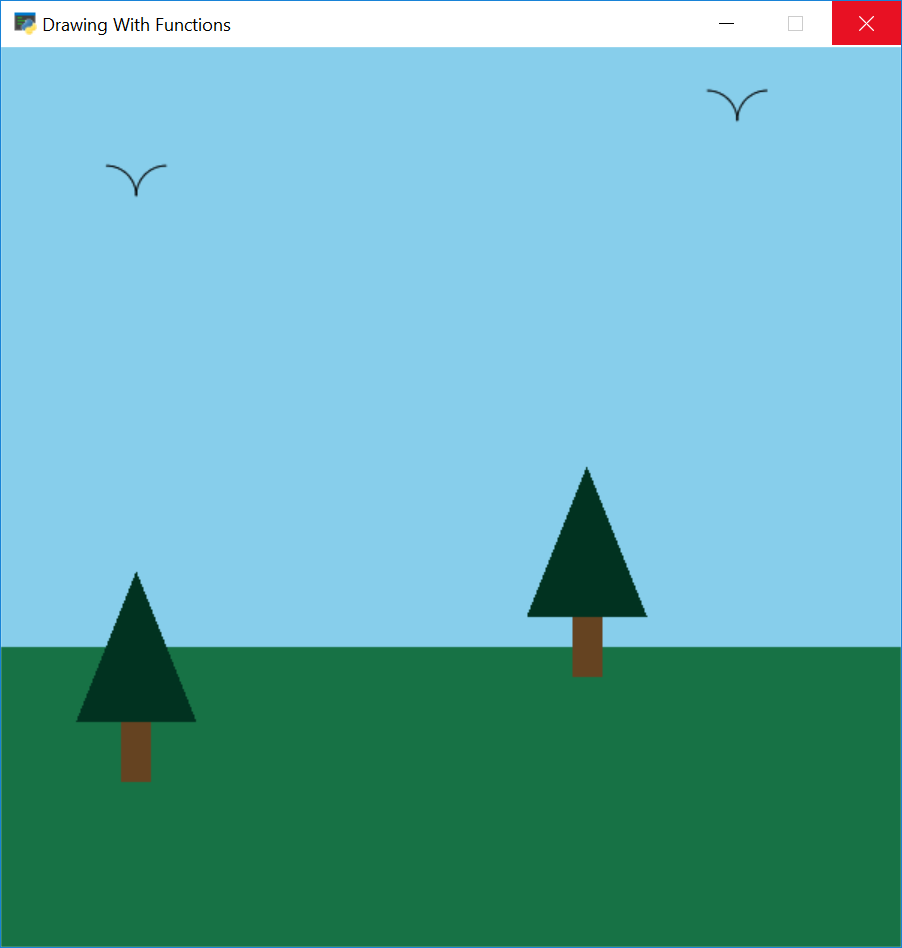
Using functions
Of course, writing code in the global context isn't good form. Thankfully improving your program by using functions is easy. Here we can see an example of a drawing a pine tree at a specific (x, y) location using a function:
def draw_pine_tree(x, y):
    """ This function draws a pine tree at the specified location. """

    # Draw the triangle on top of the trunk.
    # We need three x, y points for the triangle.
    arcade.draw_triangle_filled(x + 40, y,       # Point 1
                                x, y - 100,      # Point 2
                                x + 80, y - 100, # Point 3
                                arcade.color.DARK_GREEN)

    # Draw the trunk
    arcade.draw_lrtb_rectangle_filled(x + 30, x + 50, y - 100, y - 140,
                                      arcade.color.DARK_BROWN)
For the full example, see drawing with functions.
The more experienced programmer will know that modern graphics programs first load drawing information onto the graphics card, and then ask the graphics card to draw it later as a batch. Arcade supports this as well. Drawing 10,000 rectangles individually takes about 0.800 seconds. Drawing them as a batch takes less that 0.001 seconds.
The Window class
Larger programs will typically derive from the Window class, or use decorators. This allows a programmer to write code to handle drawing, updating, and handling input from the user. A template for a starting a Window-based program is below.
import arcade

SCREEN_WIDTH = 800
SCREEN_HEIGHT = 600


class MyGame(arcade.Window):
    """ Main application class. """

    def __init__(self, width, height):
        super().__init__(width, height)

        arcade.set_background_color(arcade.color.AMAZON)

    def setup(self):
        # Set up your game here
        pass

    def on_draw(self):
        """ Render the screen. """
        arcade.start_render()
        # Your drawing code goes here

    def update(self, delta_time):
        """ All the logic to move, and the game logic goes here. """
        pass


def main():
    game = MyGame(SCREEN_WIDTH, SCREEN_HEIGHT)
    game.setup()
    arcade.run()


if __name__ == "__main__":
    main()
The Window class has several methods that your programs can override to provide functionality to the program. Here are some of the most commonly used ones:
on_draw: All the code to draw the screen goes here.update: All the code to move your items and perform game logic goes here. This is called about 60 times per second.on_key_press: Handle events when a key is pressed, such as giving a player a speed.on_key_release: Handle when a key is released, here you might stop a player from moving.on_mouse_motion: This is called every time the mouse moves.on_mouse_press: Called when a mouse button is pressed.set_viewport: This function is used in scrolling games, when you have a world much larger than what can be seen on one screen. Callingset_viewportallows a programmer to set what part of that world is currently visible.
Sprites
Sprites are an easy way to create a 2D bitmapped object in Arcade. Arcade has methods that make it easy to draw, move, and animate sprites. You can also easily use sprites to detect collisions between objects.
Creating a sprite
Creating an instance of Arcade's Sprite class out of a graphic is easy. A programmer only needs the file name of an image to base the sprite off of, and optionally a number to scale the image up or down. For example:
SPRITE_SCALING_COIN = 0.2

coin = arcade.Sprite("coin_01.png", SPRITE_SCALING_COIN)
This code will create a sprite using the image stored in coin_01.png. The image will be scaled down to 20% of its original height and width.
Sprite lists
Sprites are normally organized into lists. These lists make it easier to manage the sprites. Sprites in a list will use OpenGL to batch-draw the sprites as a group. The code below sets up a game with a player, and a bunch of coins for the player to collect. We use two lists, one for the player and one for the coins.
def setup(self):
    """ Set up the game and initialize the variables. """

    # Create the sprite lists
    self.player_list = arcade.SpriteList()
    self.coin_list = arcade.SpriteList()

    # Score
    self.score = 0

    # Set up the player
    # Character image from kenney.nl
    self.player_sprite = arcade.Sprite("images/character.png", SPRITE_SCALING_PLAYER)
    self.player_sprite.center_x = 50 # Starting position
    self.player_sprite.center_y = 50
    self.player_list.append(self.player_sprite)

    # Create the coins
    for i in range(COIN_COUNT):

        # Create the coin instance
        # Coin image from kenney.nl
        coin = arcade.Sprite("images/coin_01.png", SPRITE_SCALING_COIN)

        # Position the coin
        coin.center_x = random.randrange(SCREEN_WIDTH)
        coin.center_y = random.randrange(SCREEN_HEIGHT)

        # Add the coin to the lists
        self.coin_list.append(coin)
We can easily draw all the coins in the coin lists:
def on_draw(self):
    """ Draw everything """
    arcade.start_render()
    self.coin_list.draw()
    self.player_list.draw()
Detecting sprite collisions
The function check_for_collision_with_list allows us to see if a sprite runs into another sprite in a list. We can use this to see all the coins the player sprite is in contact with. Using a simple for loop, we can get rid of the coin from the game and increase our score.
def update(self, delta_time):
    # Generate a list of all coin sprites that collided with the player.
    coins_hit_list = arcade.check_for_collision_with_list(self.player_sprite, self.coin_list)

    # Loop through each colliding sprite, remove it, and add to the score.
    for coin in coins_hit_list:
        coin.kill()
        self.score += 1
For the full example, see collect_coins.py.
Game physics
Many games include some kind of physics. The simplest are top-down programs that prevent the player from walking through walls. Platformers add more complexity with gravity and platforms that move. Some games use a full 2D physics engine with mass, friction, springs, and more.
Top-down games
For simple top-down based games, an Arcade program needs a list of walls that the player (or anything else) can't move through. I usually call this wall_list. Then a physics engine is created in the Window class's setup code with:
self.physics_engine = arcade.PhysicsEngineSimple(self.player_sprite, self.wall_list)
The player_sprite is given a movement vector with its two attributes change_x and change_y. A simple example of doing this would be to have the player move with the keyboard. For example, this might be in the custom child of the Window class:
MOVEMENT_SPEED = 5

def on_key_press(self, key, modifiers):
    """Called whenever a key is pressed. """

    if key == arcade.key.UP:
        self.player_sprite.change_y = MOVEMENT_SPEED
    elif key == arcade.key.DOWN:
        self.player_sprite.change_y = -MOVEMENT_SPEED
    elif key == arcade.key.LEFT:
        self.player_sprite.change_x = -MOVEMENT_SPEED
    elif key == arcade.key.RIGHT:
        self.player_sprite.change_x = MOVEMENT_SPEED

def on_key_release(self, key, modifiers):
    """Called when the user releases a key. """

    if key == arcade.key.UP or key == arcade.key.DOWN:
        self.player_sprite.change_y = 0
    elif key == arcade.key.LEFT or key == arcade.key.RIGHT:
        self.player_sprite.change_x = 0
Although that code sets the player's speed, it doesn't move the player. In the update method of the Window class, calling physics_engine.update() will move the player, but not through walls.
def update(self, delta_time):
    """ Movement and game logic """

     self.physics_engine.update()
For a full example see sprite_move_walls.py.
Platformers
Moving to a side view platformer is rather easy. A programmer just needs to switch the physics engine to PhysicsEnginePlatformer and add in the gravity constant.
self.physics_engine = arcade.PhysicsEnginePlatformer(self.player_sprite,
                                                     self.wall_list,
                                                     gravity_constant=GRAVITY)
You can use a program like Tiled to lay the tiles/blocks that make up your level.
For an example, see sprite_tiled_map.py.
For full 2D physics you can integrate the PyMunk library.
Learn by example
One of the best ways to learn is by example. The Arcade library has a long list of example programs that a person can draw on to create games. These examples each show a game concept that students have asked for in my classes or online over the years.
Running any of these demos is easy once Arcade has been installed. Each of the samples has a comment at the beginning of the program with a command you can type on the command-line to run the sample, for example:
python -m arcade.examples.sprite_moving_platforms- Arts
- Business
- Computers
- Games
- Health
- Home
- Kids and Teens
- Money
- News
- Personal Development
- Recreation
- Regional
- Reference
- Science
- Shopping
- Society
- Sports
- Бизнес
- Деньги
- Дом
- Досуг
- Здоровье
- Игры
- Искусство
- Источники информации
- Компьютеры
- Личное развитие
- Наука
- Новости и СМИ
- Общество
- Покупки
- Спорт
- Страны и регионы
- World
