How to make a pond
An artificial pond is a decorative design element of any suburban area. Garden pond is a habitat for beautiful aquatic plants, useful amphibians and insects. Making a small pond in the country or a plot of a country house with your own hands is an exciting job. Read about which pond to choose, as well as the design and construction of the pond.
What kind of pond to make on the site
There are two main typesof garden artificial ponds:
- From a ready-made plastic bowl for the pond.
- With a special film, which is lined with an arbitrarily dug pit on the site.
Ready-made forms for the pond are of regular geometric shapes, and there are levels (terraces). The latter is the best option. Such bowls simulate the height differences in the pond and will allow the use of different types of aquatic plants.
Pond with your own hands: size, shape and choice of place
Fora garden pond, it is better to choose an open place, illuminated by direct sun at least 4-6 hours a day. The sun is important for aquatic plants, which should be in any garden pond. However, it also contributesto the increased growth of algae. A place away from trees will partially limit theingress of autumn leaves into the pond, which complicate the cleaning of the pond and pollute the water.
The decorative pond should fit into the composition and be clearly visible from the house, from the veranda or from therecreation area, in accordance with the overall design of the site.
The style of the garden pond should correspond to the style of your country house and plot. So, a natural-style pond will look good ina landscape-style gardenor ina natural garden. A pond of a clear geometric shape will suit a formal garden. An excellent addition tothe design of the pond is the element of a waterfall or cascade (mountain stream), which also contributes to better hygiene of the pond in the future.
The size and depth of the pond on the sitedirectly depend on the purpose of the pond, the size of the cottage and your choice of aquatic plants. Many water lilies require a depth of 90-150 cm, but otheraquatic plantswill grow only 30-50 cm.
Pond on the site: what you will need
Tobuild a pond with your own hands, you will need:
A bowl for a pond of the largest possible size for your garden. The finished pond will seem smaller because of the sides of the bowl covered with decorative material. Or...
Film for the pond and protective material for the film (geotextile, coconut mat or just large flaps of an old synthetic palace).
Sand.
Building materials for the design of the coastal strip and the creation of a cascade or waterfall.
For a small artificial pond, you will need a hydraulic pump for the circulation and aeration of water (if desired, with a filter), and therefore access to the power grid.
Large stones and shell for the design of the bottom of an artificial pond.
Pond with your own hands: construction
Outline the perimeter of the pond with a rope or garden hose and dig a hole of the desired depth and shape. Clean the hole under the pond from large rhizomes and sharp stones and cover with sand for a few centimeters.
Pit for film for pond
Do not forget to make steps - height differences (the so-called terraces): deeper to the middle and shallower to the shores. One bank of the pond should be made gently sloping.
Lay out the protective material and film for the pond close to the bottom and with a margin, carefully covering all height differences. Also leave a large supply of film along the banks of the pond. Subsequently, as the pond is filled with water, the film will straighten and move to the center under the weight of the water. When the pond is filled to the brim with water, you can cut off the film, leaving a margin of 30 cm from the edges of the pond.
The film is more elastic and easier to lay out on a warm day.
Pit under the bowl for the pond
Install a bowl for the pond in the pit so that the top of the bowl is 3-4 cm above the ground level. Fill with sand the free spaces between the bowl and the walls of the pit, strengthen the bowl in the pit.
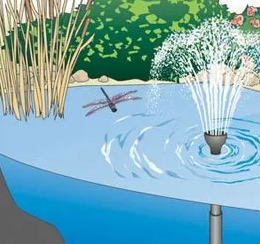
Install a water pump on the bottom of the pond, place the filter in a hidden place on the shore, connect the pump hose(s). Secure the water outlet hose (future waterfall) in the right place on the elevation on the shore.
Lay out the bottom of the pond with decorative stones of different sizes, in accordance with the pre-thought-out composition, pour the shell. Gently stone the pump hose in smaller areas of the pond where it can be seen.
Gradually fill the pond with tap or filtered rainwater (regular rainwater will not work!).
- Arts
- Business
- Computers
- Giochi
- Health
- Home
- Kids and Teens
- Money
- News
- Personal Development
- Recreation
- Regional
- Reference
- Science
- Shopping
- Society
- Sports
- Бизнес
- Деньги
- Дом
- Досуг
- Здоровье
- Игры
- Искусство
- Источники информации
- Компьютеры
- Личное развитие
- Наука
- Новости и СМИ
- Общество
- Покупки
- Спорт
- Страны и регионы
- World
